여러 공식문서와 글들을 보고 드디어 자마린 fcm 푸시 발송에 성공하였습니다.
그 내용들을 정리해 보겠습니다. 공식문서를 보고 따라해 봤지만 계속 실패해서 왜 안될까 하다가 우연히 수정해서 성공했습니다.
FCM 푸시 발송 방법
우선 Firebase에 앱을 만들어 줘야 합니다. 다른건 신경쓸 필요없고 패키지 네임 넣을때 앱이름과 같도록 넣어줘야 합니다. 이 부분만 조심해 주시면 어려울게 없습니다.
프로젝트의 xxx.android 프로젝트 속성의 Android 매니페스트 패키지 이름을 아래의 Android Package Name에 넣어 줍니다.

그리고 google-services.json를 다운받아 xxx.Android 프로젝트에 넣어 주고 해당파일 속성의 빌드 작업을 GoogleServicesJson로 변경해 줍니다.

만약 GoogleServicesJson이 없으면 프로젝트를 재 실행 해 줍니다.
그리고 xxx.Android 누겟패키지에서 3가지 라이브러리를 다운받아 줍니다.
Xamarin.GooglePlayServices.Base
Xamarin.Firebase.Iid
Xamarin.Firebase.Messaging
그리고 xxx.Android 의 MainActiviy클래스에 아래 함수를 추가 합니다.
public bool IsPlayServicesAvailable ()
{
	string msgText = string.Empty;
    int resultCode = GoogleApiAvailability.Instance.IsGooglePlayServicesAvailable (this);
    if (resultCode != ConnectionResult.Success)
    {
        if (GoogleApiAvailability.Instance.IsUserResolvableError (resultCode))
            msgText = GoogleApiAvailability.Instance.GetErrorString (resultCode);
        else
        {
            msgText = "This device is not supported";
            Finish ();
        }
        return false;
    }
    else
    {
        msgText = "Google Play Services is available.";
        return true;
    }
}

void CreateNotificationChannel()
{
    if (Build.VERSION.SdkInt < BuildVersionCodes.O)
    {
        // Notification channels are new in API 26 (and not a part of the
        // support library). There is no need to create a notification
        // channel on older versions of Android.
        return;
    }

    var channel = new NotificationChannel(CHANNEL_ID,
                                          "FCM Notifications",
                                          NotificationImportance.Default)
                  {

                      Description = "Firebase Cloud Messages appear in this channel"
                  };

    var notificationManager = (NotificationManager)GetSystemService(Android.Content.Context.NotificationService);
    notificationManager.CreateNotificationChannel(channel);
}
IsPlayServicesAvailable 함수는 해당기기가 구글과 통신을 할 수 있는지 확인하는 함수이고CreateNotificationChannel 함수는 채널을 만들어 주는 함수입니다. 채널ID는 임의로 아무거나 넣어주시면 됩니다.
그리고 OnCreate함수에서 각각위의 함수를 호출해 줍시다.
protected override void OnCreate (Bundle bundle)
{
    base.OnCreate (bundle);
    SetContentView (Resource.Layout.Main);

    IsPlayServicesAvailable ();

    CreateNotificationChannel();
}
그다음 매니페스트에 리시버를 달아 줍시다.
<?xml version="1.0" encoding="utf-8"?>
<manifest xmlns:android="http://schemas.android.com/apk/res/android" android:versionCode="1" android:versionName="1.0" package="kr.co.golfus" android:installLocation="auto">
	<uses-sdk android:minSdkVersion="21" android:targetSdkVersion="31" />
	<uses-permission android:name="android.permission.ACCESS_NETWORK_STATE" />
	<uses-permission android:name="android.permission.BIND_DREAM_SERVICE" />
	<uses-permission android:name="android.permission.INTERNET" />
	<application android:label="xxx.App.Xamarin.Android" android:theme="@style/MainTheme">
		<receiver
    android:name="com.google.firebase.iid.FirebaseInstanceIdInternalReceiver"
    android:exported="false" />
	</application>

</manifest>
그런다음에 xxx.Android에 클래스를 MyFirebaseIIDService.cs로 만들어 줍니다.
[Service]
    [IntentFilter(new[] { "com.google.firebase.INSTANCE_ID_EVENT" })]
    public class MyFirebaseIIDService : FirebaseInstanceIdService
    {
        const string TAG = "MyFirebaseIIDService";
        public override void OnTokenRefresh()
        {
            var refreshedToken = FirebaseInstanceId.Instance.Token;
            Log.Debug(TAG, "Refreshed token: " + refreshedToken);
            SendRegistrationToServer(refreshedToken);
        }
        void SendRegistrationToServer(string token)
        {
            // Add custom implementation, as needed.
        }
    }
이부분은 구글과 통신해 클라이언트 푸시키를 얻는 부분입니다.
마지막으로 푸시를 수신해서 처리해주는 부분을 만들어 줍니다.
MyFirebaseMessagingService.cs를 루트에 만들어 줍니다.
[Service]
    [IntentFilter(new[] { "com.google.firebase.MESSAGING_EVENT" })]
    public class MyFirebaseMessagingService : FirebaseMessagingService
    {
        const string TAG = "MyFirebaseMsgService";
        public override void OnMessageReceived(RemoteMessage message)
        {
            Log.Debug(TAG, "From: " + message.From);
            Log.Debug(TAG, "Notification Message Body: " + message.GetNotification().Body);
        }
    }
자 그러면 모든 준비가 완료 되었습니다.
저는 리시버로 토큰이 안들어와서 OnCreate함수에
var refreshedToken = FirebaseInstanceId.Instance.Token;
이렇게 클라이언트 토큰을 가져왔는데 잘나오네요
protected override void OnCreate (Bundle bundle)
{
    base.OnCreate (bundle);
    SetContentView (Resource.Layout.Main);

    IsPlayServicesAvailable ();

    CreateNotificationChannel();

    var refreshedToken = FirebaseInstanceId.Instance.Token;
}
왜 리시버에 안들어오는지 아시는분 답변 부탁드립니다. ㅠㅠ
이제 클라이언트키를 발급했으니 해당키로 테스트 해보시면 됩니다.
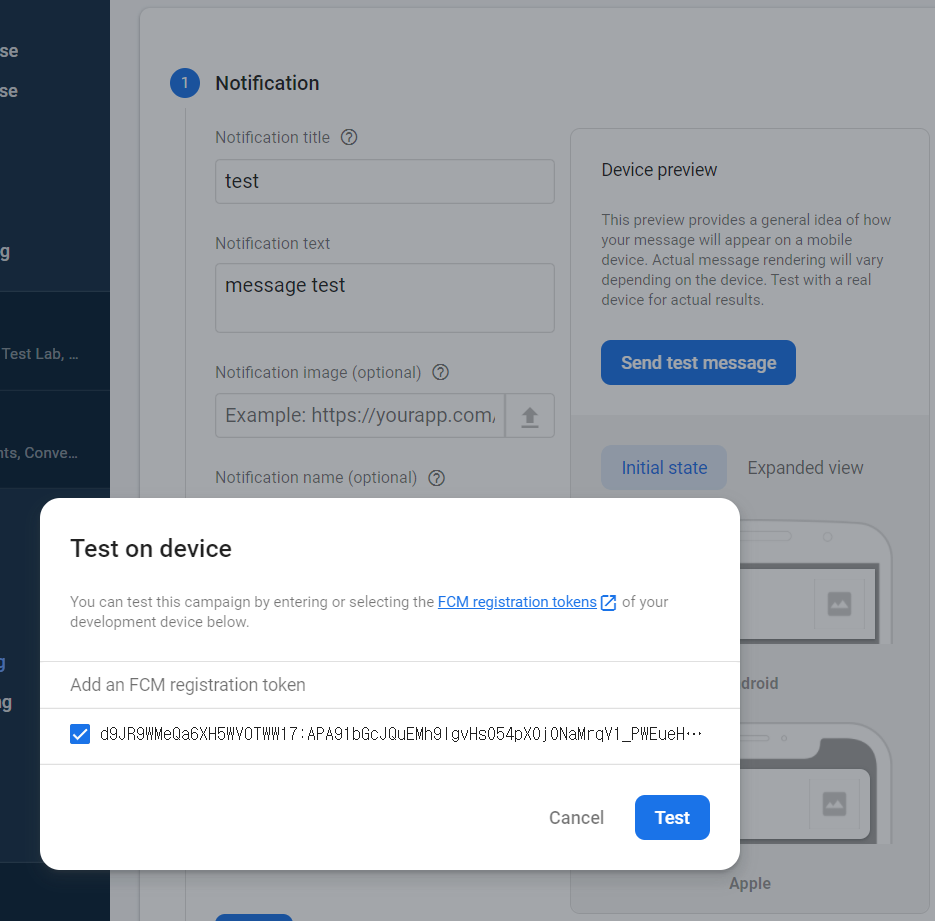
테스트 방법은 fcm사이트에서 할 수 있습니다.

왼쪽 메뉴에서 Cloud Messaging페이지에 들어가시면 테스트 할 수 있는 버튼이 있습니다.

방금 발급받은 클라이언트키를 넣고 Test버튼을 눌러줍니다.
메시지를 발송하면 클라이언트의 MyFirebaseMessagingService 클래스의 OnMessageReceived함수로 해당 메시지가 들어옵니다.

디버거를 했는데 푸시 발송후 해당 메시지가 잘 들어오네요
이제 진짜 마지막으로 푸시 수신할때 해당 내용을 노티로 사용자에게 알려주는 함수를 만들어 줍시다.
[Service]
    [IntentFilter(new[] { "com.google.firebase.MESSAGING_EVENT" })]
    public class MyFirebaseMessagingService : FirebaseMessagingService
    {
        const string TAG = "MyFirebaseMsgService";
        public override void OnMessageReceived(RemoteMessage message)
        {
            Log.Debug(TAG, "From: " + message.From);
            Log.Debug(TAG, "Notification Message Body: " + message.GetNotification().Body);
            var body = message.GetNotification().Body;
            SendNotification(body, message.Data);
        }

        void SendNotification(string messageBody, IDictionary<string, string> data)
        {
            var intent = new Intent(this, typeof(MainActivity));
            intent.AddFlags(ActivityFlags.ClearTop);
            foreach (var key in data.Keys)
            {
                intent.PutExtra(key, data[key]);
            }

            var pendingIntent = PendingIntent.GetActivity(this,
                                                          MainActivity.NOTIFICATION_ID,
                                                          intent,
                                                          PendingIntentFlags.OneShot);

            var notificationBuilder = new NotificationCompat.Builder(this, MainActivity.CHANNEL_ID)
                                      .SetSmallIcon(Resource.Drawable.abc_ic_clear_material)
                                      .SetContentTitle("FCM Message")
                                      .SetContentText(messageBody)
                                      .SetAutoCancel(true)
                                      .SetContentIntent(pendingIntent);

            var notificationManager = NotificationManagerCompat.From(this);
            notificationManager.Notify(MainActivity.NOTIFICATION_ID, notificationBuilder.Build());
        }
    }
MyFirebaseMessagingService 클래스를 위와같이 만들어 줍시다.
그러면 메시지가 오면 푸시로 들어옵니다.!!

잘 들어 오네요!!
'[개발] 이야기 > [DotNet] 이야기' 카테고리의 다른 글
| blazor for문에서 index값 참조형이 아닌 값형으로 사용 (0) | 2022.01.03 |
|---|---|
| blazor server 쿠키인증 로그인 처리 방법 (무조건 됩니다.)- Authorization requires a cascading parameter of type Task<AuthenticationState>에러 해결법도 있어요 (3) | 2022.01.01 |
| blazor server iis에 배포를 했지만 에러가 날 때 (0) | 2021.12.25 |
| Blazor 코드에서 페이지 이동 처리하기 (0) | 2021.12.21 |
| blazor form Submit validation 방법 (0) | 2021.12.19 |

댓글